Import roles using Transports
To import roles using Transports into ECC and GW development/sandbox system:
- Extract the zip or .rar files that you received from Innovapptive and save the files to your local machine.
-
Extract and upload/copy the files to the SAP ECC & GW System
Directories.
- Extract the zip files and copy all co-files (files starting with ‘K902*’) from software deployment package to the USR/SAP/TRANS/COFILES path on SAP ECC & GW system.
- Extract the zip files and copy all the data files R902* provided in the software deployment package to the specified path on the SAP ECC &GW system USR/SAP/TRANS/DATA.
- Log in to the SAP GW & ECC System (based on the transport being imported).
- Navigate to the transaction code STMS_Import.
-
Navigate to Extras, Other Requests, Add.
Figure 1. Import Queue 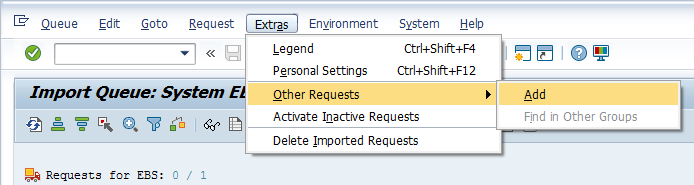
-
Enter the transport number in the Transp. Request field and confirm by
pressing the ENTER key (or click the green-colored icon) to attach
transports to the import queue.
Figure 2. Add Transport Request to Import Queue 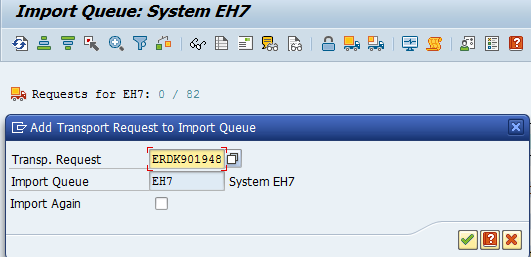
- Click Yes to proceed to the next step.
- Select the transport request that needs to be imported.
-
Click the Truck icon (highlighted by red in the screenshot).
Figure 3. Truck icon 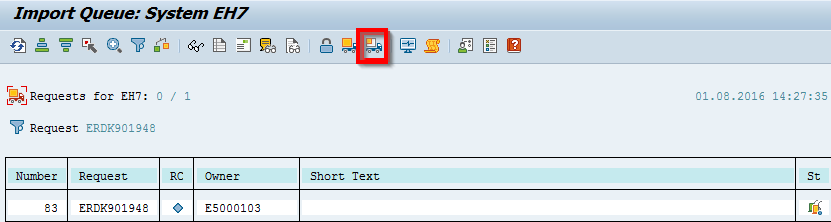
- Enter the target client number in Target Client field.
- Select Leave Transport Request in Queue for Later Import and Ignore Invalid Component Version check boxes.
-
Click Yes in the confirmation screen.
Note: If you face any issues/errors while importing the Transports, send the log files with screenshots and details of the error to your Innovapptive SAP Basis team contact assigned to your project.