Create a Service Notification
Create a service notification, when it is time for service of an equipment or a functional location. When you create a service notification, you select a service partner / vendor detail, select the service required dates and so on.
To create a service notification:
-
In the Home screen, tap Create
 icon in the My Notifications area.
Note: You can also tap the Create
icon in the My Notifications area.
Note: You can also tap the Create icon in the Notifications screen.
Figure 1. Create Service Notification 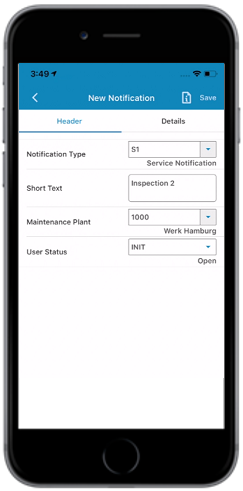
-
In the New Notification screen, do the following in the Header
tab:
- Notification Type: Select the Notification Type from the list (for example, S1 (Service Notification)).
- Short Text: Enter short description.
- Maintenance Plant: Select the Maintenance Plant from the list. The Equipment list, Functional Location, and Material/Assembly available for the Maintenance Plant is updated in the respective drop-down lists.
- User Status: Select the User Status from the list.
-
In the Details tab, do the following under the Notification
tab:
Note: Fields that are displayed depend on the UI validations configured in RACE. For example, if the UI validation is configured to hide Functional Location field based on Notification Type like M1 then the Functional Location field is not displayed when you select M1 in Notification Type field.
Familiar extensions for Equipment and Functional Location hierarchy such as Technical ID that help you identify assets easily can be configured through RACE. When done, you can also search assets using the extension field data.
- Functional Location: Select Functional Location from the list.
After selecting the functional location, tap the Hierarchy
 icon against Functional
Location field and from the pop-up screen select a sub
functional location or an equipment.Note:
icon against Functional
Location field and from the pop-up screen select a sub
functional location or an equipment.Note:- If you tap the Functional Location Hierarchy icon without
selecting any Functional Location, the application shows an
error.
- mWorkOrder supports 30 characters for the Functional Location ID. You can configure SAP for Alternate Labeling to support 40 characters ID.
- If you tap the Functional Location Hierarchy icon
- Equipment No: Select Equipment for the functional location from
the list or, tap the Hierarchy
icon against the
Equipment field and select the equipment.
- Planner Group: Select Planner Group from the list.
- Planning Plant: Select Planning Plant from the list.
- Work Center: Select Work Center from the list.
- Crew ID: Select Crew ID from the list.
- Reported By: This field is auto-populated. Tap the field to enter a different name.
- Notification Date: This field is auto-populated. Tap the
Calendar
 icon to select a different Notification
Date.
icon to select a different Notification
Date. - Coding: Select Coding from the list.
- Description: Tap the Maximize
 icon to enter the description or select the
predefined template. On the pop-up screen tap Templates to select
the template.
icon to enter the description or select the
predefined template. On the pop-up screen tap Templates to select
the template. - Priority: Select Priority from the list.
- Required Start Date: This field is auto-populated. Tap the
Calendar
icon to set a different Required Start
Date.
- Required Start Time: This field is auto-populated. Tap the
Clock
 icon to set a different Required Start
Time.
icon to set a different Required Start
Time. - Required End Date: Tap the Calendar
icon to select the Required End Date.
- Required End Time: Tap the Clock
icon to select the Required End Time.
- Breakdown: Select check-box for breakdown if any.
- Malfunction Start Date: Tap the Calendar
icon to select the Malfunction Start
Date.
- Malfunction Start Time: Tap the Clock
icon to select the Malfunction Start
Time.
- Malfunction End Date: Tap the Calendar
icon to select the Malfunction End
Date.
- Malfunction End Time: Tap the Clock
icon to select the Malfunction End
Time.
- Assembly UI Label: Select Assembly UI Label.
- Person Responsible: Select Partners from the list.
- Item Number: Select the item number.
- Risk Assessment: Tap the drop-down to assess the overall risk
level. The Risk Assessment window appears.
In the Risk Assessment window, select the scenario for the category and the probability of occurrence of the scenario. The Overall Risk Level is calculated based on the Risk Level identified for these categories:
- Consequence to People: Helps you analyze the impact of
the incident on people.
- People: Select the scenario that defines the impact on people.
- Likelihood: Select the probable occurrence of the scenario.
- Risk Level: Risk level is auto-populated based on the scenario and probability of occurrence of the scenario.
- Consequence to Asset: Helps you analyze the impact of the
incident on the asset.
- Asset: Select the scenario that defines the impact on asset.
- Likelihood: Select the probable occurrence of the scenario.
- Risk Level: Risk level is auto-populated based on the scenario and probability of occurrence of the scenario.
- Consequence to Environmental: Helps you analyze the
impact of the incident on environment.
- Environmental: Select the scenario that defines the impact on the environment.
- Likelihood: Select the probable occurrence of the scenario.
- Risk Level: The risk level is auto-populated based on the scenario and probability of occurrence of the scenario.
- Consequence to Reputation: Helps you analyze the impact
of the incident on the stature and fame of the organization.
- Reputation: Select the scenario that defines the impact on the reputation because of the incident.
- Likelihood: Select the probable occurrence of the scenario.
- Risk Level: The risk level is auto-populated based on the scenario and probability of occurrence of the scenario.
Note: You can configure the values for Consequence and Likelihood fields using RACE to determine the Risk Level for the category.
- Consequence to People: Helps you analyze the impact of
the incident on people.
- Functional Location: Select Functional Location from the list.
After selecting the functional location, tap the Hierarchy
-
Tap the
 icon to create a measurement
document for the Equipment that is entered in the Notification.
(Optional).
icon to create a measurement
document for the Equipment that is entered in the Notification.
(Optional).
-
Tap Save.
Note: You can directly tap the other tabs in the Details tab to fill the other details and save later once all the required details are filled.
-
Tap Yes in the notification creation confirmation screen.
A message appears confirming that the Notification <number> is created successfully.
Note:- In the pop up screen, tap View NO List to navigate to the record that is created.
- You can edit the service notification details at any point before the service notification is marked complete from the same screen by clicking the Edit button.