How to conduct inspections using assigned forms
To inspect an asset assigned to you:
- In the Inspections screen, tap the My Inspections tab.
-
Select an inspection.
The Inspection Details screen is displayed.
In this screen, you can,- View the details like Title, Description, Plant, Author, Shift, Start Date & Time, and Due Date & Time.
- View relevant notes and attachments like images and PDFs, in the Notes and Attachments section.
- View additional information in the Additional Details section.
- Skip the inspection by selecting a relevant reason such as Plant
Shutdown, Insufficient Resources/Spares, Locations/Assets
Inaccessible, Environmental Hindrance, Safety Concerns, or Others.
To skip the inspection, tap the More
 icon > Skip Inspection. The
skipped inspection is displayed in the My Inspections tab with the
Skipped status and then removed after 24 hours (configurable).
icon > Skip Inspection. The
skipped inspection is displayed in the My Inspections tab with the
Skipped status and then removed after 24 hours (configurable).
Figure 1. Start Inspection 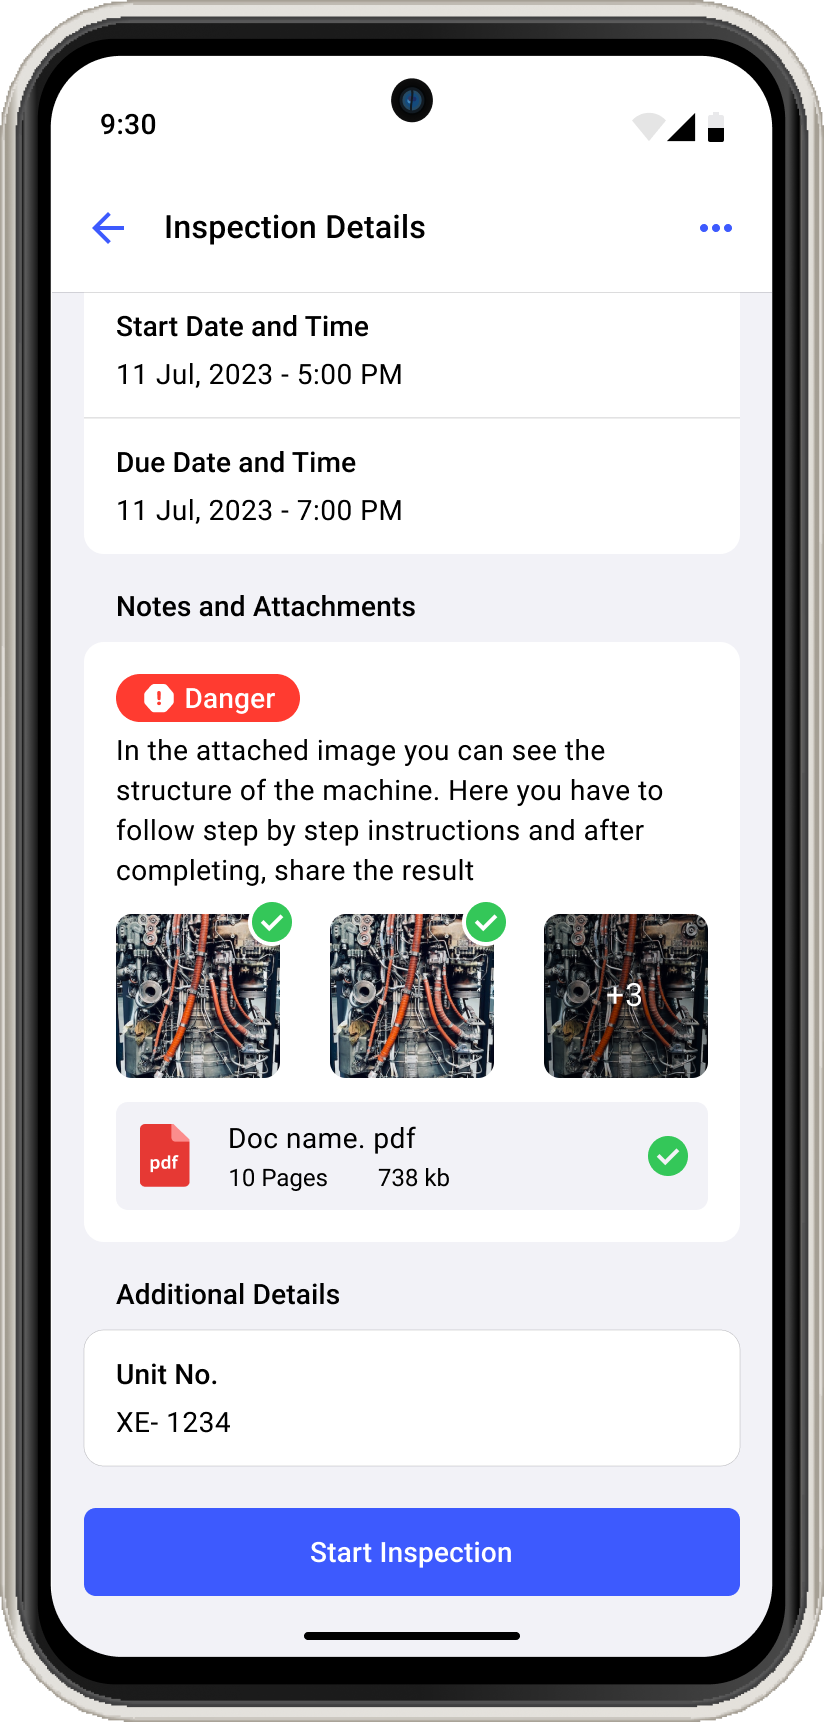
-
Tap Start Inspection
The Asset Details screen with the list of questions is displayed.
In this screen, you can,
- Navigate through the inspection using the
 Previous and Next
  icons and execute questions.
 - View only open questions using Show Open Questions Only slider.
- Navigate through the pages using Page 1, Page 2, Page 3, and so on buttons.
- Navigate through the inspection using the
-
Expand each section in a page to fill the details in the question as you do
inspection.
Figure 2. Expand Sections 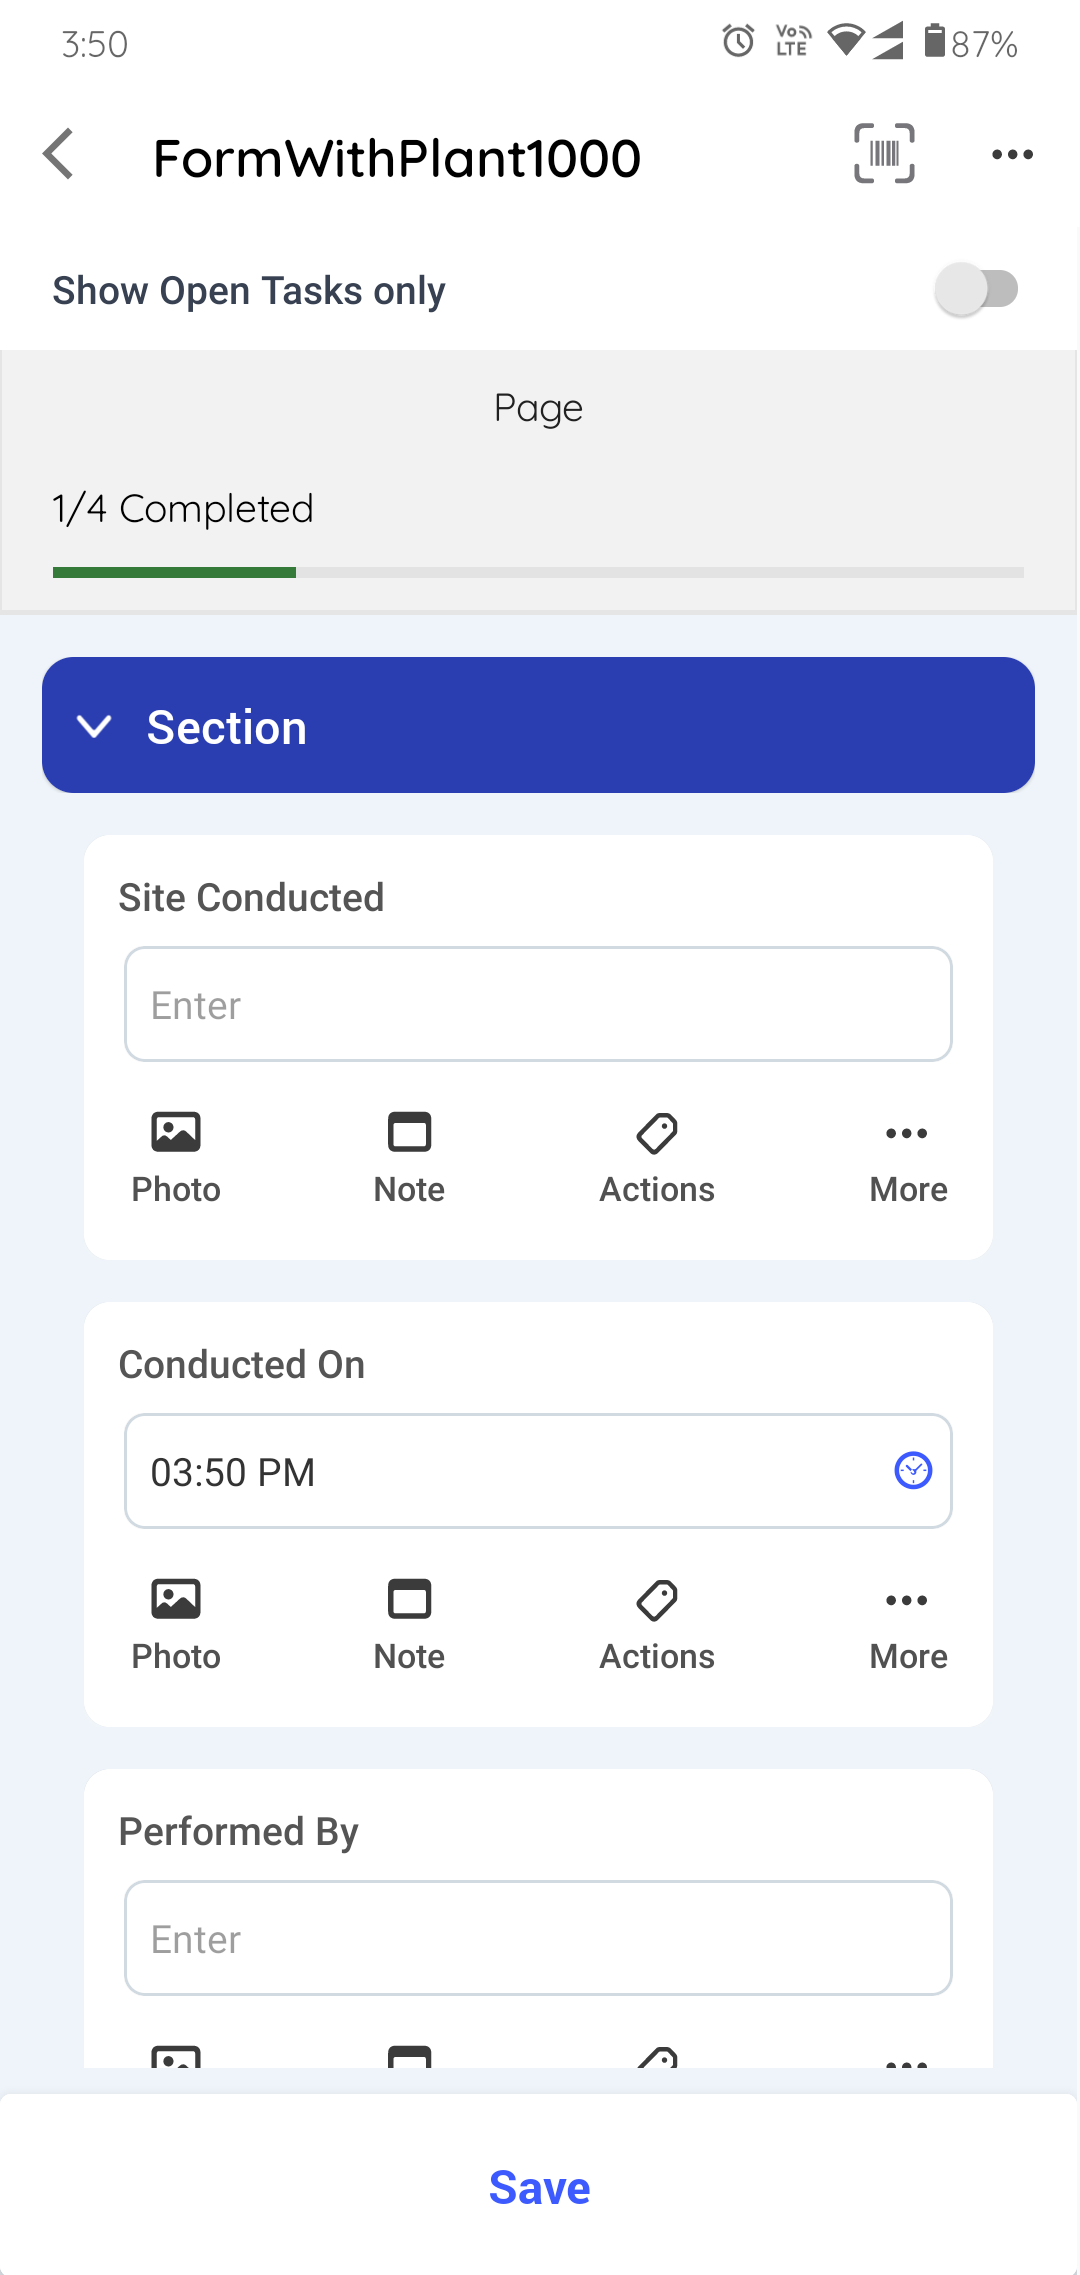
The count of questions is displayed on the individual sections. The total count of questions shown in the progress bar is equal to the count of questions shown in each section. If there are condition logics like, Ask or Hide Questions then the count increases or decreases accordingly and if a question is skipped or unskipped then the count in the section is not affected.
-
Fill the details in the question using any of the following choices.
- Read Only Field
- Text Answer
- Number
- Number with the Unit of Measurement
- Number Range
- Popup Message Based on Number Range
- Check box
- Scan
- Date and Time
- Slider
- Geo Location (To capture an asset location)
- Date Range
- Photo
- Signature
- Hyperlink
- Instructions
- Multiple Choice
- Global Picklist
Note:You can enter decimal and negative values when filling questions that have a number response type.
In the question, you can,- View the calculated value or result in the numeric response field based on the pre-configured formula in the Web application. For more information, see Add Formulas to fields.
- Tap the Attachments
 icon to add photos,
videos (up to 1 minute), or documents (PDF, Word, or Excel) of an
asset or equipment.Note: You can view and access these attachments as links in the generated PDF after submitting the inspection. Click the link to download the attachment.
icon to add photos,
videos (up to 1 minute), or documents (PDF, Word, or Excel) of an
asset or equipment.Note: You can view and access these attachments as links in the generated PDF after submitting the inspection. Click the link to download the attachment. - Tap the Note
 icon to add notes or additional
information.
icon to add notes or additional
information. - Tap the Actions
 icon to create an action
for the asset. For more information, see Create an Action.
icon to create an action
for the asset. For more information, see Create an Action. - Tap the More
icon > Create
Issue to create an issue for the asset. For more
information, see Create an Issue.
When you tap Create Issue, a pop-up with following options is
displayed:
- Show Issues: Tap the option to view the history or previously created issues against the asset/location.
- Create New Issue: Tap the option to create or raise a new issue.
- Cancel: Tap the option to cancel the issue creation process.
- Tap the More
icon > Show
Additional Details to create an issue for the asset.
- Tap the More
icon > Skip
Question to skip the question when it is not mandatory or
not required. Tap Unskip near the skipped question to unskip
the question.Note:
Select a relevant reason such as Offline, Out of Service, Inaccessible, Task not relevant, or Others to skip the questions. You can provide a custom response if the reason is not present in the drop-down. When you skip a question, provide a reason, it is marked as skipped. The Questions Summary section displays the count of skipped questions within each asset, and the progress bar excludes skipped questions from the completed count. The skipped status of questions reflects in both the generated PDF and the Inspections screen.
If a character limit is set for the field, it appears in the field. This limit is configured in the mInspections web application to help you enter accurate and required data. Do not exceed the character limit specified in the field.
- Tap Page 1, Page 2, or Page 3... to navigate to the next page.
-
Tap the Save button if you want to save and update the Form details
later.
A message "Inspection Saved Successfully" appears, and the status of the inspection is changed to In Progress. This saved inspection appears in the My Forms tab under the In Progress section.
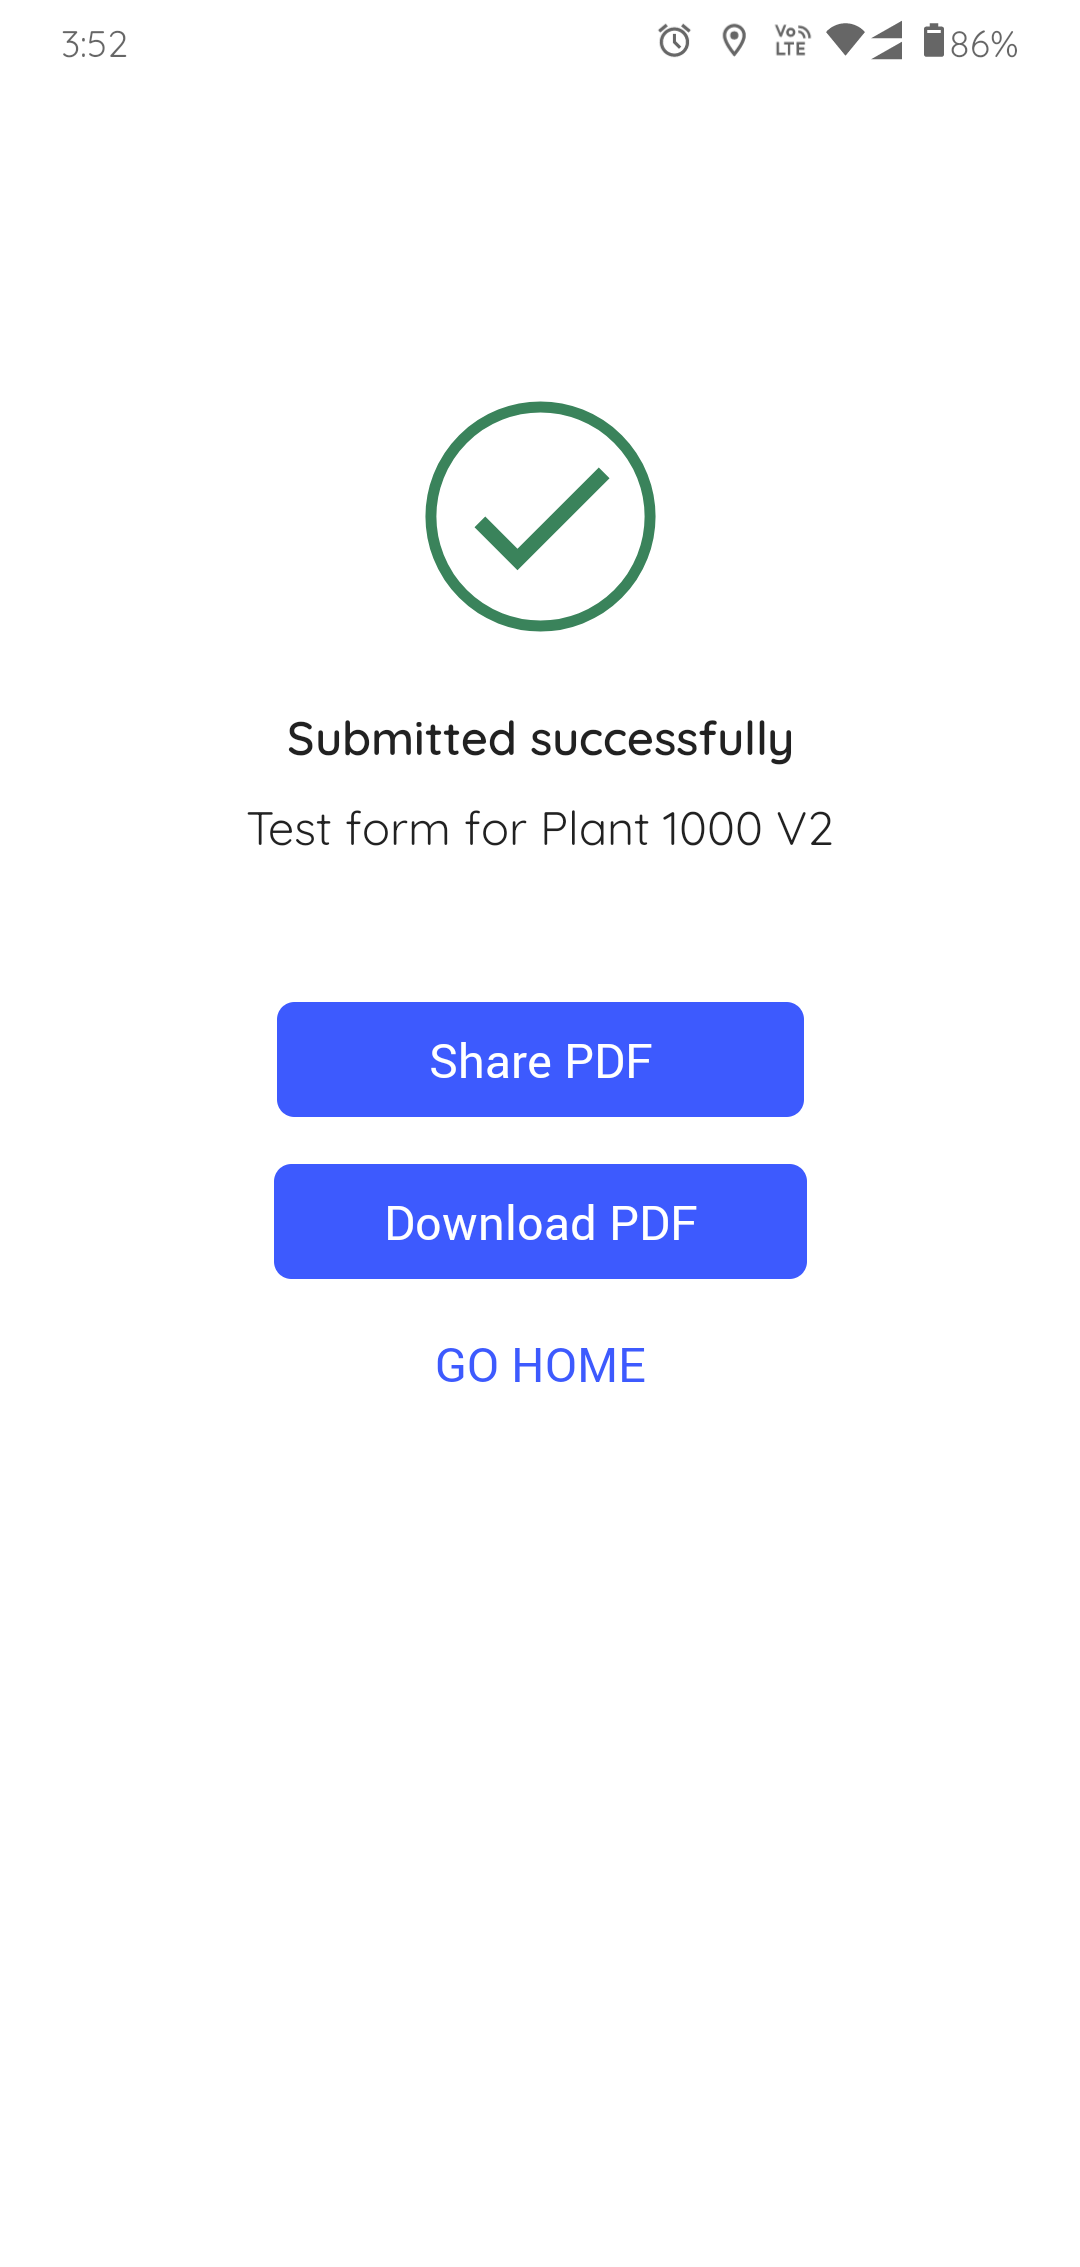
Note: If there are pending or open tasks, data in the fields not filled in, or if the inspection is partially completed, a warning message “You missed some mandatory fields” is displayed. Tap Review to review the pending tasks or fields or tap Save as in Progress to save the inspection and update it later.Figure 3. Submit Inspection 
-
In the Submission Confirmation pop-up, tap the Submit button after
filling in all the details.
A message "Inspection Submitted Successfully appears" with the Share PDF and Go Home buttons, and the status of the inspection is changed to Submitted. This submitted inspection appears in the Submitted section under the My Inspections tab.
Figure 4. Submitted Inspection