
Create Roles and Permissions
Roles control which iPermits modules, permit actions, and safety features a user can access. Each role defines what a user can view, create, review, approve, issue, or manage within the iPermits system. Roles are typically aligned with permit personas such as Permit Requestor, Reviewer, Authorizer, Issuer, Safety Officer, and Administrator.
To create a role and assign permissions:
-
Navigate to User Management > Roles and
Permissions.
Figure 1. Roles and Permissions Screen 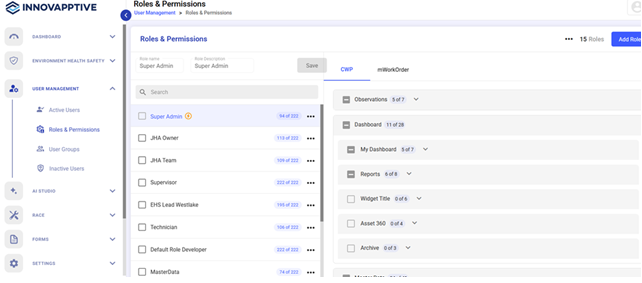
- Click Add Role.
- Fill in Role Name and Role Description.
- Click Save.
- Select the new role.
- Choose the modules that are required for the role or persona on the right-side.
-
Click Save.
Use More icon > Copy to clone existing roles.
Use More icon > Delete to delete the role.
Note:- The Super Admin role cannot be edited or deleted. It can only be copied.
- You cannot delete a role that is currently assigned to users. Unassign users first, then delete the role.
- You cannot delete roles that are assigned to users or edit the Super Admin role.
- • Assign permissions carefully to ensure segregation of duties — for example, the same user should not both issue and authorize permits unless required by policy.
Best Practice for iPermits Role Design
Align roles with permit responsibilities:
- Permit Requestor - Create and submit permits.
- Permit Reviewer - Review risk, JHA, and safety controls.
- Permit Authorizer - Approve permits based on authority.
- Permit Issuer - Issue permits and validate site readiness.
- Permit Holder - Execute work under approved permits.
- Safety / EHS Admin - oversee safety rules and compliance.
- System Admin - manage configuration and access.