Create and Publish Forms
You can build forms using a visual builder that lets you define pages, sections, questions, and response types. These forms can be tailored to different inspection or reporting scenarios, improving consistency and usability in the field.
To create a form manually:
- Expand the Forms module.
- Click Embedded Forms in the left menu.
- Click Create New on the right side.
-
In the Form Details screen, provide the following:
Field Description Form Name Enter a name (e.g., Equipment Inspection). Description Describe the purpose of the form. Instance Type Select Single or Multiple Instance. Plant Select the applicable plant. Tags Add tags to categorize the form. Auto Assignment of Forms Assign Forms based on Equipment, Functional Location, Tasklist, Maintenance Plan and Work order Type. Add Measuring Point Section Add Measuring Point category related section of Equipment and Functional location. Additional Details (Optional) Add custom fields with Labels (max 25 chars) and Values (max 40 chars). Figure 1. Add Form Details 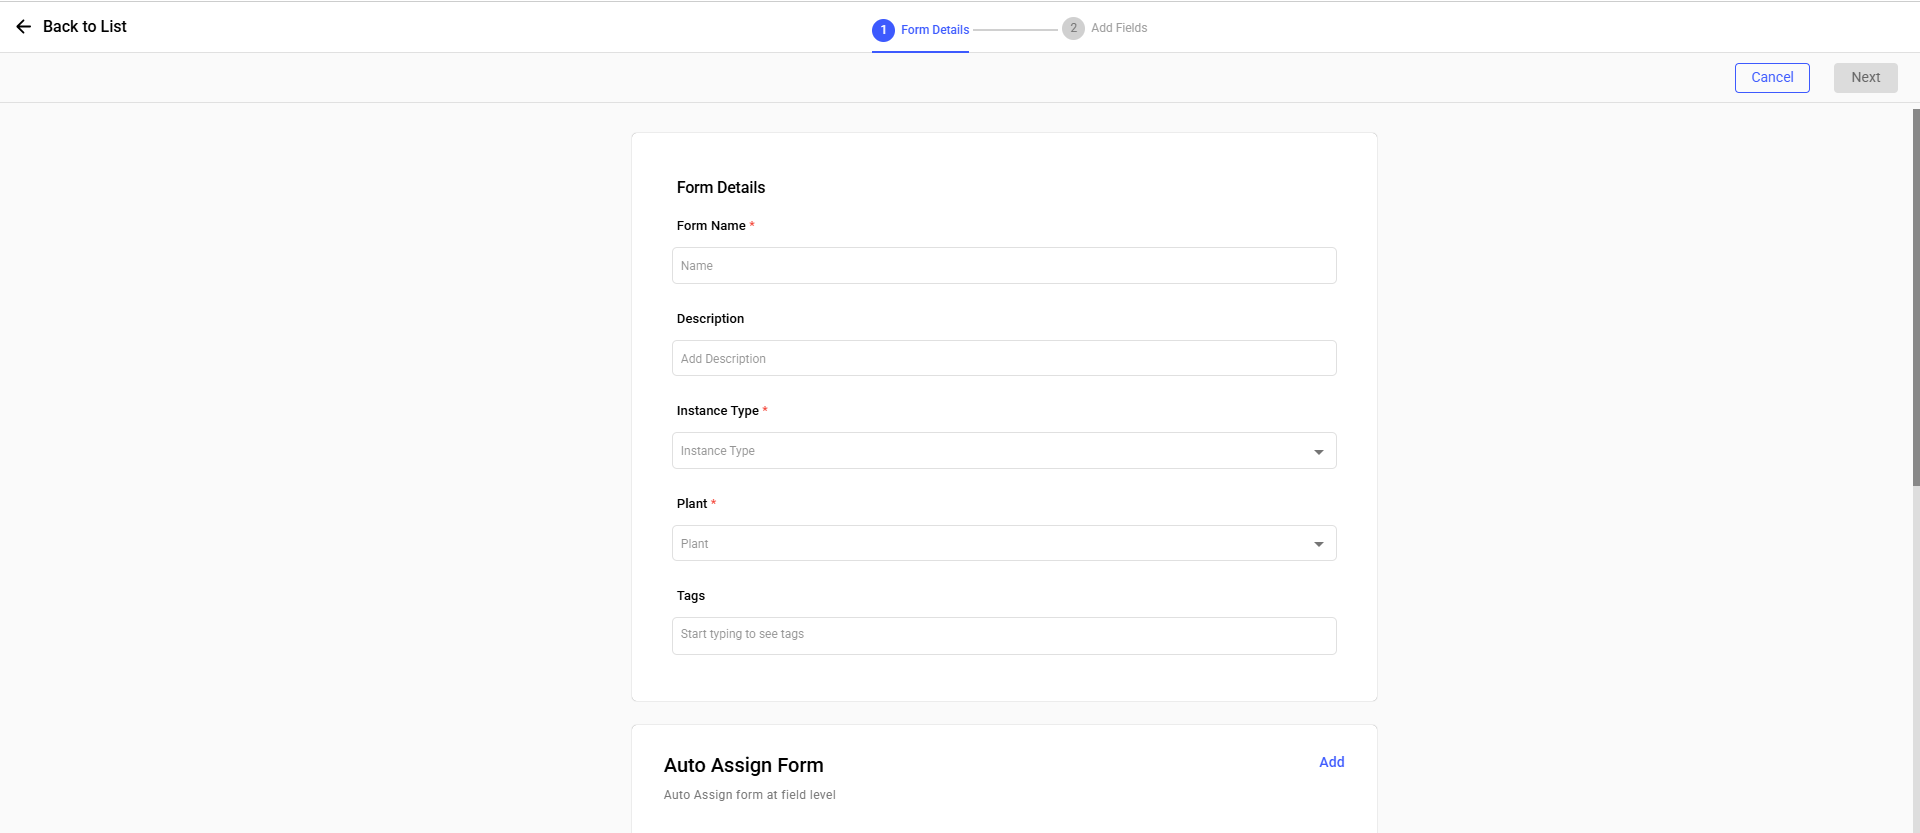
- Click Next.
-
In the Add Fields screen:
- Add Pages, then Sections within each page.
- Insert Fields (Questions) into sections.
- Select Response Type (text, multiple choice, slider, etc.)
- As an OOTB a section with 4 fields will auto-populate in the second step.
- User should be able to Rename/Reorder/Delete the fields and change the response type.
- User should be able to Rename the section.
Each Response Type is a field/input type used in the Authoring Module of Platform modules.Response Type Description Supported Properties Read Only Displays reference data. No user input allowed. Add Logic, Default Value, Localization, Enable, Required, Input Data. Text Free text input (e.g., title, descriptions). Add Logic, Default Value, Additional Details, Localization, Enable, Required, Type Number Numeric values field Add Logic, Default Value, Additional Details, Localization, Enable, Required, Unit, History, Range, Formula Date & Time Calendar input for date & time values. Additional Details, Localization, Enable, Required, Date & Time Format Signature Captures digital signatures from users. Additional Details, Localization, Enable, Required Scan Uses device camera to scan QR/barcode. Additional Details, Localization, Enable, Required Hyperlink Clickable link to web or document resources. Additional Details, Localization, Enable, Required, Add Link User Selects a user from the system. Add Logic, Default Value, Additional Details, Localization, Enable, Required Slider Selects a value from a defined scale. Add Logic, Default Value, Additional Details, Localization, Enable, Required, Range, History Geo Location Captures GPS location of user. Additional Details, Localization, Enable, Required Add Photo Upload images for visual evidence. Additional Details, Localization, Enable, Required Form Embeds a nested form within the main form. Add Logic, Forms, Field Configurations, Additional Details, Localization, Enable, Required. Search Text Searchable text field for selecting values from Drop-down. Add Logic, Input Data, Localization, Enable, Required Instructions Displays non-editable instructional text. Additional Details, Enable, Required, Add Tags, Add Files. Array List field group (e.g., items, causes). Additional Details, Localization, Enable, Required, Input Data. Date Range Selects a start and end date. Additional Details, Localization, Enable, Required Attachments Uploads documents or files (PDFs, DOCs, Voice, Image, etc.). Additional Details, Localization, Enable, Required, Attachment Details Checkbox Boolean input for Yes/No selection. Add Logic, Additional Details, Localization, Enable, Required Toggle UI toggle for ON/OFF selection. Add Logic, Localization, Enable, Required. Risk Matrix Triggers a configurable risk priorities drop-down values Add Logic, Additional Details, Localization, Enable, Required Scan Search Text Scan barcode to search and drop-down to select values. Add Logic, Localization, Enable, Required, Input Data - Set conditions or logic (e.g., show/hide based on answers) as shown in the below table.
- Mark fields as Required, enable History, or apply Localization.
Response Type PropertiesAdd Logic Enables conditional rules for a field (show/hide Field/Section, Raise Issue, Mandatory field/Section etc.) based on field values. Default Value Pre-fills the field with a value when the form loads in mobile application. Additional Details Allows admin to define character limit or extra metadata for users. Localization Allows admin to translate field labels into multiple languages. Enable Toggles whether the field is active and visible in the consumption. Required Marks the field as mandatory for submission. Input Data Allow admin to define collection of dataset for field. Unit Allows admins to select a unit of measurement (e.g., °C, Kg, hrs) to numeric fields. History Allows admin stores previous values entered in the field. Range Sets a minimum and maximum limit for values (typically in number or slider). Formula Supports calculated values based on other Numeric field inputs. Date & Time Allows admin to define which date format should be used in the consumption. Add Link Allows the field to point to an external URL or system reference. Type Defines the technical input format (e.g., string, number, object) – mostly system-managed. Upload Files Allows users to attach images, PDFs, or documents to the field. Add Tags Lets admin apply metadata tags for filtering, grouping, or analytics. Figure 2. Add Questions 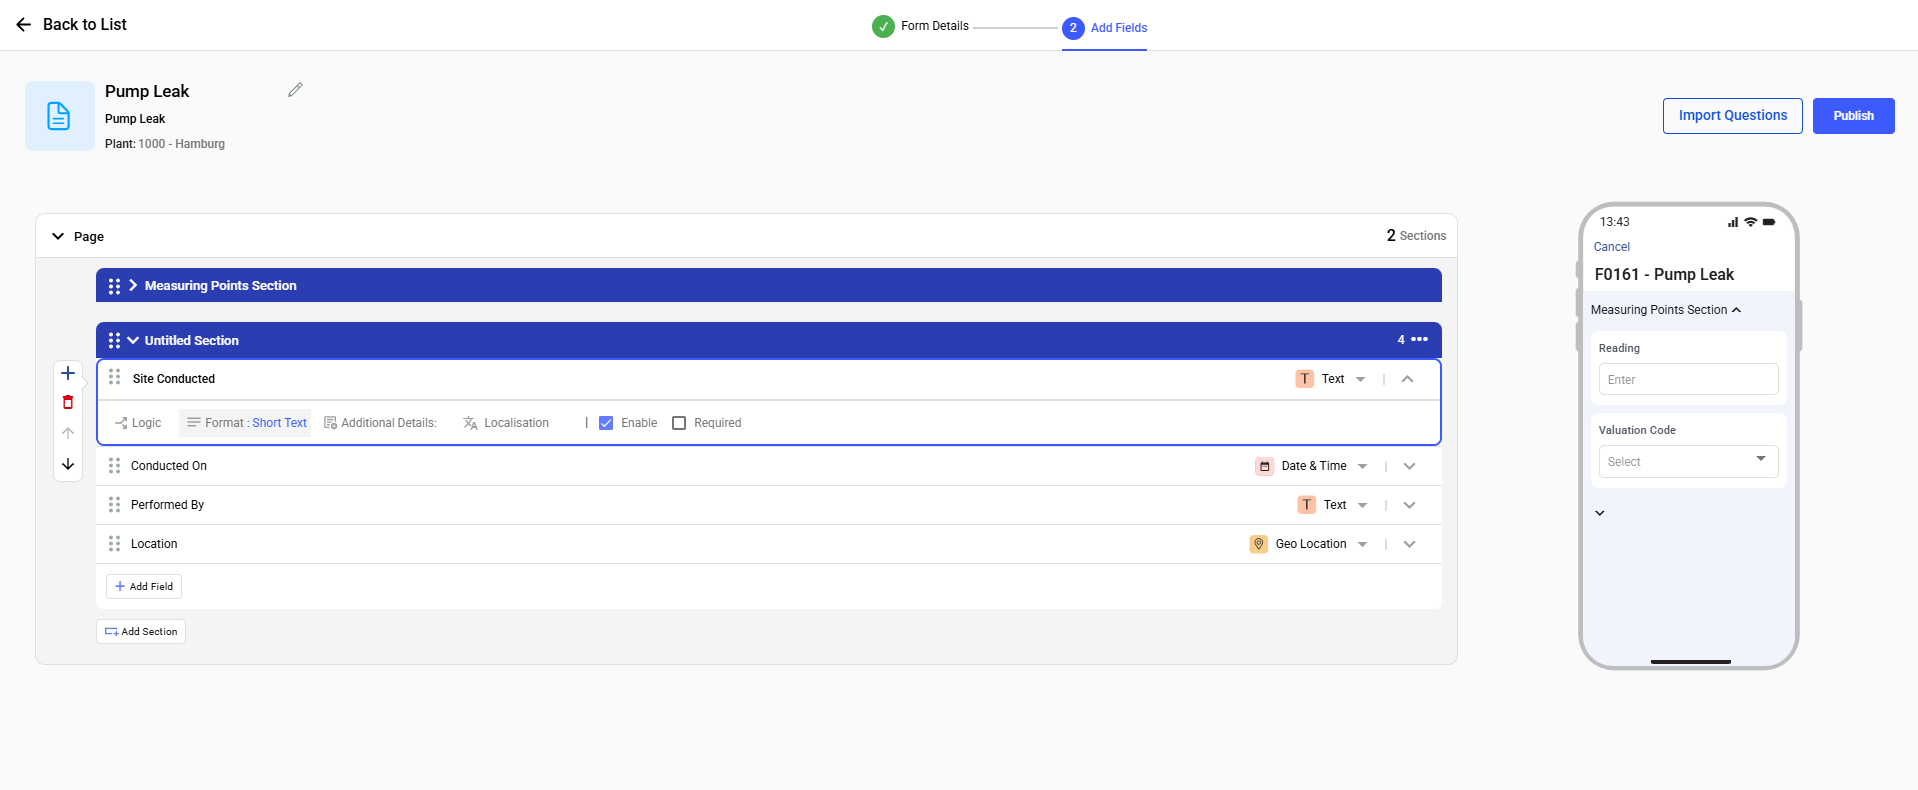
- Use Preview (right side) to see how the form appears in the mobile app.
-
Once done, click Publish.
The form is now live and visible in the My Forms screen with Published status.