Record Movement of Goods into Warehouse using Purchase Order
When you receive goods from an external vendor into the warehouse, you can update the purchase order and post the Goods Receipt. You can also receive rental goods and record the movement into the storage location using the Purchase Order option.
You can issue materials directly to the Onsite plant vendors without assigning them to storage bins when there is Cross Dock delivery (Offshore Delivery). This helps you to reduce labor, time, and cost of handling materials.
A purchase order can have multiple line items which contain a list of components/materials (Subcontracting PO). If your vendor provides sub-components and if these sub-components are added in the SAP system, you can view these items here, validate them and post the goods receipt.To record movement of goods into warehouse using a purchase order:
- In the Home screen, tap Good Receiving.
- Tap the Reference Document drop-down and select Purchase Order.
-
In the search screen, do a combo scan or manually enter the details like
Purchasing Document Number, Plant number , Vendor,
Certificate, and Material Number.
Note:
- When the Vendor field is configured as an SSI field in RACE, you can tap the Vendor field and enter the vendor description (any digits) to search for the vendor number.
- If Yes is selected in the Certificate field, uploading an attachment is mandatory before posting. If No is selected, posting can proceed without requiring an attachment.
- Tap the Scan (OCR)
 button next to the field to scan the
barcode data. The OCR field type is RACE configurable.
button next to the field to scan the
barcode data. The OCR field type is RACE configurable.
Figure 1. Goods Receiving using Purchase Order Search 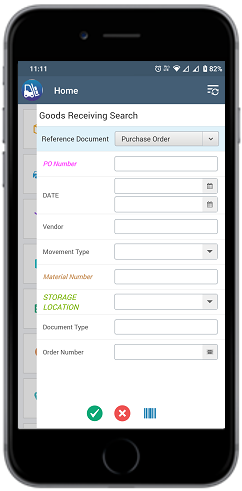
-
Tap Search.
In the search results screen, you can:
- Tap the Search button to search the purchase order.
- Tap the Scan button to scan a batch of line items.
- Sort and filter the records. For more information, see Sort records and Filter records.
Figure 2. Goods Receiving Purchase Order List 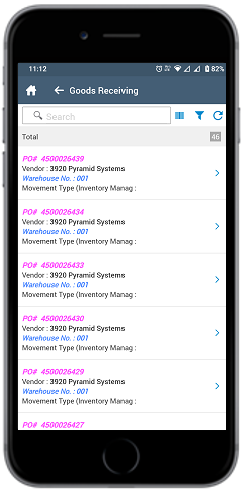
- Tap the purchase order for which you want to post a goods receipt.
-
Tap the Calendar
 icon to modify the date of posting.
In the purchase order details screen, the following fields are auto-populated:
icon to modify the date of posting.
In the purchase order details screen, the following fields are auto-populated:- PO Number
- Vendor
- Net Order Value
Figure 3. Goods Receiving Purchase Order Details 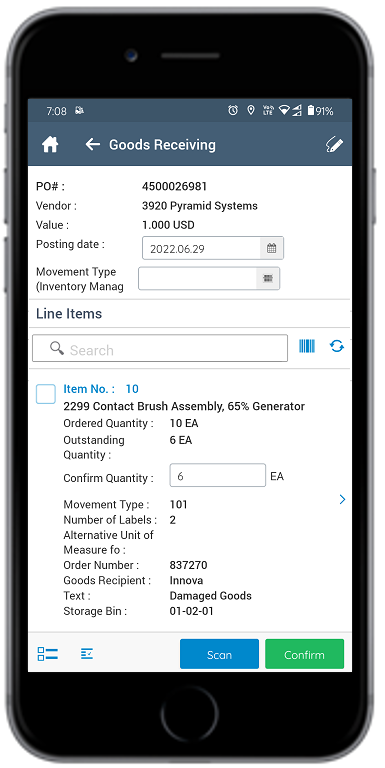
-
Select and enter this information for the line item(s):
- Confirm Quantity: This value is auto-populated. Tap to modify the
value.Note:To split the quantity, tap the Split
 icon. In the Quantity Split window, enter the quantity in the
Confirm Quantity fields. The material quantity is divided and
assigned to respective bins.
icon. In the Quantity Split window, enter the quantity in the
Confirm Quantity fields. The material quantity is divided and
assigned to respective bins. - Storage Location: Tap to select the storage location from the list.
- Alternate UOM: Tap to select the Alternate Unit of Measure.
Note:Tap the Sub Items icon for the line
item to view and select the sub-components.
icon for the line
item to view and select the sub-components. - Confirm Quantity: This value is auto-populated. Tap to modify the
value.
-
Tap the line item to view or modify the details such as Material
Description, Delivery Date, Plant, Batch,
Material PO text, Item text, and Attachments.
If the Material is batch managed, you can split the received quantity into multiple batches.
-
Tap the Signature icon to add your digital signature and enter the
following details in the Signature box:
- Telephone: Tap to enter the telephone number.
- First Name: Tap to enter the first name.
-
Tap Confirm.
Tap Reset to erase and enter a new signature.
-
Tap Confirm.
A message appears asking whether you want to post the goods receipt.
-
Tap OK.
A message appears confirming that the Material Document <number> is posted for Purchase Order <number>.
For every quality material (QM) that is posted, a quality Inspection Lot number is generated. The quality team uses the lot number and does the inspection of the material.
Figure 4. Goods Receipt using Purchase Order Posting 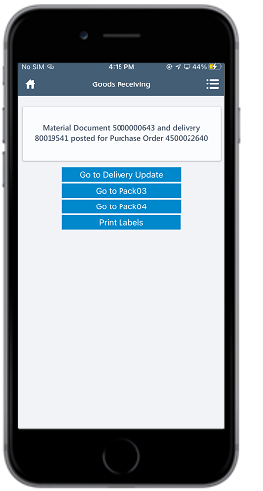
Note:From this screen, you can:- Access and pack the deliveries for O3O_PACK03 using the Go to Pack03 button. For more information, see Pack Deliveries to Containers (o3o_PACK03).
- Access and pack the deliveries for O3O_PACK04 using the Go to Pack04 button. For more information, see Pack Deliveries (o3o_PACK04).
- Access and update the Delivery Document details using the Go to Delivery Update button. For more information, see Post Goods Issue (PGI) using Delivery Update Module.
- Print the material document and labels. For more information, see Print material documents and labels.
- Send the material documents, such as PDF through email. For more information, see Email material documents.
- Access the Putaway by Transfer Request button to view the stored items.
- Navigate to the Material Document Display module through a direct link after successful posting.